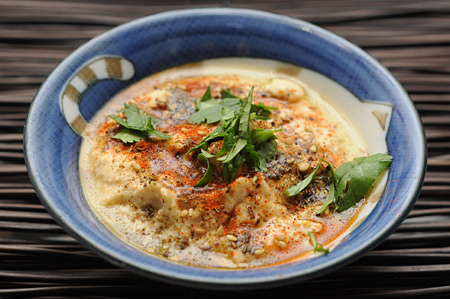
Let me start by saying that most hummus found in conventional stores tastes dreadful and has very little to do with the original hummus you can taste in the Middle East. Store bought hummus is usually improperly mixed, overloaded with an unnecessary bunch of cliché ingredients (like garlic and peppers, everything but good chick peas) and costs 3-4 times more than if you were to make it yourself.
I lived 3 years in the Middle East and tried hummus everywhere from Palestine to Jordan to Israel and it has nothing to do with the crap you get in conventional stores. In fact, the only good commercially sold hummus I know of is made by a company called “Sabra.” Usually you can find it in your local Middle Eastern market. Not strangely so, it’s the same brand they sell all over Middle East.
Hummus is a spectacularly easy dish to make and takes just a few minutes – all you have to do is mix some stuff up and “dress” it later for serving.
Why is it called “hummus”? – It means garbanzo beans in Arabic and other languages, and as you’ll see from the recipe, Garbanzo beans (also known as chick peas) is THE main ingredient in Hummus!

Hummus
Equipment: Blender or Food Processor (food processor is better)
Ingredients:
1 can (about 1 ½ cup) of cooked garbanzo beans (chick peas)
1 ½ large tablespoon of Tahini (sesame paste)
Juice of ½ lemon
1 tsp of salt
Olive oil (1-2 tbsp)
In food processor or blender process garbanzos with a little bit of water added. Add water slowly to best control desired consistency. It’s your choice to make it creamier or chunkier – both are great. Add tahini and mix well. Add salt and lemon juice and olive oil. Mix. Taste and adjust salt and lemon juice to personal taste. Keep in mind that it will taste stronger (better!) after hummus stands for a few hours in the fridge. Serve with pita brad or pita chips.
Making Tahini Sauce: (optional, for dressing)
Take a tablespoon of tahini and slowly keep adding and mixing in milk or cream until a thin sauce is formed. You want to make sure the sauce slides off spoon, but is not too runny. Add a pinch of salt. Mix. Add on top of hummus when serving.
Dressing a bowl of hummus:
Take a bowl put some hummus in it and a bit of olive oil along the edges of the bowl. Take a spoon and spiral it down the down from outer to inner edge – that should spread oil equally. Put any of choice, or any of your own on top:
Here are my favorite combinations:
Paprika & Zatar (Jordanian Thyme Mix)
Tahini Sauce & chopped parsley
Toasted pine nuts and paprika or parsley
Diced black olives & olive oil
Roasted garlic
Garbanzo or fava beans
Raw egg & salt (if you are an adventurous type)
Tips & Tricks
Home cooked garbanzos usually give a better result, but the whole point is that you can make this dish in 5 minutes, so I usually end up using canned beans as instead. However, quality garbanzos make substantially better hummus – I buy mine in a Middle Eastern market, where I also but Zatar (mentioned above) and Tahini.
The amount of water will have to be more if using a blender. Ideally hummus should be well processed, with no large chunks in it.
Buy Tahini in your local Middle Eastern or Persian market –- they will rip you off in Whole Foods and tahini will never taste as good as “from the source.” It should cost around $3 – $5 per medium sized jar.
Personal trick – never add anything more than mentioned here to hummus while making it – always add it after the hummus is done, during the “dressing” stage. Why? There are hundreds of things you can add to hummus quickly and easily and thus you can have a great variety of flavors available from one batch if you stick with the basic recipe and enhance portions of the batch later on with other ingredients. (some examples are above under “favorite combinations”) I usually make hummus a day or at least a few hours in advance. It tastes better if it “sits” in the fridge for a bit.
