Archive for the ‘Appetizers’ Category

Kale with Seaweed and Ginger Recipe

Friday, December 10th, 2010

How to cook Lacinato Kale

I have been experimenting with cooking Kale for a few years now and keep finding it to be one of my favorite green vegetables for side dishes, salads or even stand along dishes like the suddenly popping up everywhere kale chips that are in every health store in town these days. This bitter green seems to be much less common than other standard salad or side counterparts like spinach, arugula or Swiss chard, but is extremely versatile and is very easy to make.

One of my favorite ways to cook Kale is simply boiling it in water with a dash of vinegar and a pinch of salt for no more than 4-5 minutes, as in this kale and seaweed recipe below. Then you can dress it up more or less with anything you like from simple oil and lemon to nuts, chili flakes or anything that you might enjoy.
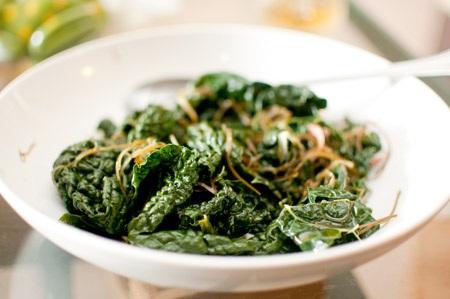
Kale with seaweed and ginger

Ingredients:

1 Bunch of Lacinato Kale

1 Tablespoon of dry Seaweed

few slices of pickled or fresh ginger

Tablespoon of sesame oil

Juice of ½ Meyer Lemon

Optional: Sesame seeds, Chili flakes

Take a tablespoon of dry seaweed, put it in a cup and reconstitute it by pouring boiling hot water over it. Let it stand for 5-10 minutes.

Meanwhile, in a 3-4 qt saucepan bring ½ of a pot of water to boil. Add a dash of salt and a tablespoon of vinegar and add Kale. Boil no longer than 4-5 minutes. Drain in the colander, making sure there is no access water left.  Add reconstituted seaweed and thinly sliced ginger on top and squeeze lemon juice over kale and dress with sesame oil. Additionally, you can sprinkle toasted sesame seeds and / or chili flakes over this dish.

Tips & Tricks:

Do not overcook Kale – it will turn rubbery and chewy as well as loose its’ color. You need to use a dash of vinegar in your water and dress with lemon first to prevent kale from discoloration.

You can get dry seaweed in Whole Foods or any local Japanese store. You don’t have to use seaweed – skip it altogether and use olive oil instead of sesame.

I usually serve this for dinner with pan-roasted halibut, salmon or other fish and seafood. It also works very well as a side to a slice of pizza
Share

Zucchini Fritters with Cheese

Saturday, February 20th, 2010

I came across a version of these fritters in one of the Italian cook books I have at the house and gave it a try primarily because it seemed like a quick, fun recipe to make and I had all the ingredients on hand. (Which is basically just zucchini and cheese!) I came up with a sauce for it, which to me made this already perfect dish even better. Over the past few months I have been playing around with it, adding this and that, substituting things and trying to perfect it. Here is one of the best variations I came up with. These are perfect as appetizers, party food or just snacks.

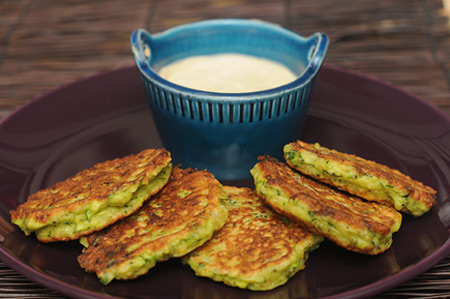
Zucchini Fritters

Zucchini Fritters


Method: Sauté, pan fry


Ingredients:


2 eggs


½ cup flour


½ cup breadcrumbs (panko or Japanese breadcrumbs seem to work best)


1-2 Tbsp Parsley


2 Tbsp Parmesan cheese


3 Tbsp fresh Ricotta cheese


2 Medium Zucchini


Salt and pepper


Sauce:


2 Tbsp Mayo


1 ½ Tbsp Sour Cream (you can skip that and add more mayo instead)


2 tsp light mustard


1 tsp curry


½ tsp cumin


½ tsp paprika


1 tsp capers


Dash of hot sauce


Few teaspoons of cream or milk to make a sauce thinner (if needed)


Beat the eggs in a large bowl, add flour, parsley and breadcrumbs and mix well. Add cheeses and mix. Then shred zucchini (with a hand shredder) and keep mixing until your batter is smooth and well integrated. Add a dash of baking powder (optional) and let rest for about 15 – 20 minutes or longer.


Preheat a sauté pan or a fry pan on medium or medium high heat until hot and add some Canola oil to it. You want a decent amount (2 -3 tbsp or so) enough to cover the pan. Using a tablespoon shape fritter dough into small round portions and lower into the hot pan and sauté on one side for 3-4 minutes, then 2-3 minutes on the other side. You should have a nice dark golden sear on each side. Serve hot with the sauce as an appetizer or just finger food.


Tips & Tricks:


I use Trader Joe’s sweet and sour mustard – it seems perfect because it’s light, flavorful and doesn’t overpower the sauce. Don’t add strong mustard here: skip completely if needed.


For crying-out-loud, don’t flip these back and forth – I hate to see people do that to food. When you sear something you let it develop a crust (a sear) by leaving it alone and letting brown in the pan. If you fear burning, lift up one side lightly to check and flip if done.


Cookware: Cast iron skillet for moister fritters or heavy gauge stainless steel for a crisper seared edge. Both are good just a slightly different result.


I always add a little cream / milk to delude the thickness of the sauce. But you definitely don’t want to add too much. Play around with it to see what works best for you.


Variations: For a sharper, stronger taste add some blue cheese or Gorgonzola instead of ricotta. Feta cheese will work beautifully as well. I recently made these with a mixture of Gruyere and cheddar and really liked the chewier and “cheesier” feel of those cheeses. Play around with herbs and other ingredients. Adding sautéed jalapenos (you have to sauté those first, otherwise they will be too crunchy) yielded a really good result. Try coriander, curry, paprika and other spices.

Share

Hummus

Friday, March 13th, 2009

Let me start by saying that most hummus found in conventional stores tastes dreadful and has very little to do with the original hummus you can taste in the Middle East.  Store bought hummus is usually improperly mixed, overloaded with an unnecessary bunch of cliché ingredients (like garlic and peppers, everything but good chick peas) and costs 3-4 times more than if you were to make it yourself.

I lived 3 years in the Middle East and tried hummus everywhere from Palestine to Jordan to Israel and it has nothing to do with the crap you get in conventional stores. In fact, the only good commercially sold hummus I know of is made by a company called “Sabra.” Usually you can find it in your local Middle Eastern market. Not strangely so, it’s the same brand they sell all over Middle East.

Hummus is a spectacularly easy dish to make and takes just a few minutes – all you have to do is mix some stuff up and “dress” it later for serving.
Why is it called “hummus”? – It means garbanzo beans in Arabic and other languages, and as you’ll see from the recipe, Garbanzo beans (also known as chick peas) is THE main ingredient in Hummus!

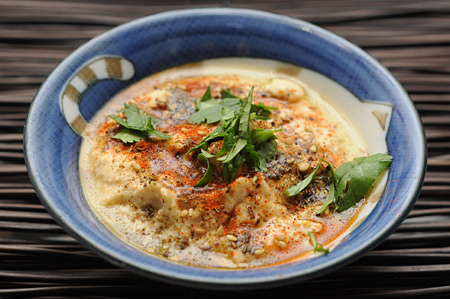
Hummus

Hummus


Equipment: Blender or Food Processor (food processor is better)

Ingredients:

1 can  (about 1 ½ cup) of cooked garbanzo beans (chick peas)
1 ½ large tablespoon of Tahini (sesame paste)
Juice of ½ lemon
1 tsp of salt
Olive oil (1-2 tbsp)

In food processor or blender process garbanzos with a little bit of water added. Add water slowly to best control desired consistency. It’s your choice to make it creamier or chunkier – both are great. Add tahini and mix well. Add salt and lemon juice and olive oil. Mix. Taste and adjust salt and lemon juice to personal taste. Keep in mind that it will taste stronger (better!) after hummus stands for a few hours in the fridge. Serve with pita brad or pita chips.

Making Tahini Sauce: (optional, for dressing)

Take a tablespoon of tahini and slowly keep adding and mixing in milk or cream until a thin sauce is formed. You want to make sure the sauce slides off spoon, but is not too runny. Add a pinch of salt. Mix. Add on top of hummus when serving.

Dressing a bowl of hummus:

Take a bowl put some hummus in it and a bit of olive oil along the edges of the bowl. Take a spoon and spiral it down the down from outer to inner edge – that should spread oil equally. Put any of choice, or any of your own on top:

Here are my favorite combinations:

Paprika & Zatar (Jordanian Thyme Mix)
Tahini Sauce & chopped parsley
Toasted pine nuts and paprika or parsley
Diced black olives & olive oil
Roasted garlic
Garbanzo or fava beans
Raw egg & salt (if you are an adventurous type)

Tips & Tricks

Home cooked garbanzos usually give a better result, but the whole point is that you can make this dish in 5 minutes, so I usually end up using canned beans as instead. However, quality garbanzos make substantially better hummus – I buy mine in a Middle Eastern market, where I also but Zatar (mentioned above) and Tahini.

The amount of water will have to be more if using a blender. Ideally hummus should be well processed, with no large chunks in it.

Buy Tahini in your local Middle Eastern or Persian market –- they will rip you off in Whole Foods and tahini will never taste as good as “from the source.” It should cost around $3 – $5 per medium sized jar.

Personal trick – never add anything more than mentioned here to hummus while making it – always add it after the hummus is done, during the “dressing” stage. Why? There are hundreds of things you can add to hummus quickly and easily and thus you can have a great variety of flavors available from one batch if you stick with the basic recipe and enhance portions of the batch later on with other ingredients. (some examples are above under “favorite combinations”)  I usually make hummus a day or at least a few hours in advance. It tastes better if it “sits” in the fridge for a bit.

Share